Smartphone photography has changed more in the last five years than DSLR photography changed in the previous twenty. The camera you carry in your pocket right now can shoot in RAW, track a moving subject’s eyes, and blend multiple exposures into a single frame before you even tap the shutter. Most people never use more than 10% of what that hardware can actually do.
This guide walks you through everything you need to start taking noticeably better photos with the phone you already own — no upgrade required. You’ll learn the camera settings worth changing today, composition tricks that work in any lighting situation, and which accessories and editing apps are actually worth your money.
By the end, you’ll understand why smartphone photography isn’t a lesser version of “real” photography — it’s its own discipline with its own strengths. If you shoot on an iPhone specifically, our iPhone photography tips guide pairs well with what’s covered here.
What Makes Smartphone Photography Different From DSLR or Mirrorless Shooting
Smartphone photography operates under a different set of physical rules than shooting with a dedicated camera. A phone can’t swap lenses, can’t change its aperture in most cases, and packs a sensor roughly the size of a fingernail clipping. Understanding these limits is the fastest way to stop fighting your phone and start working with it.
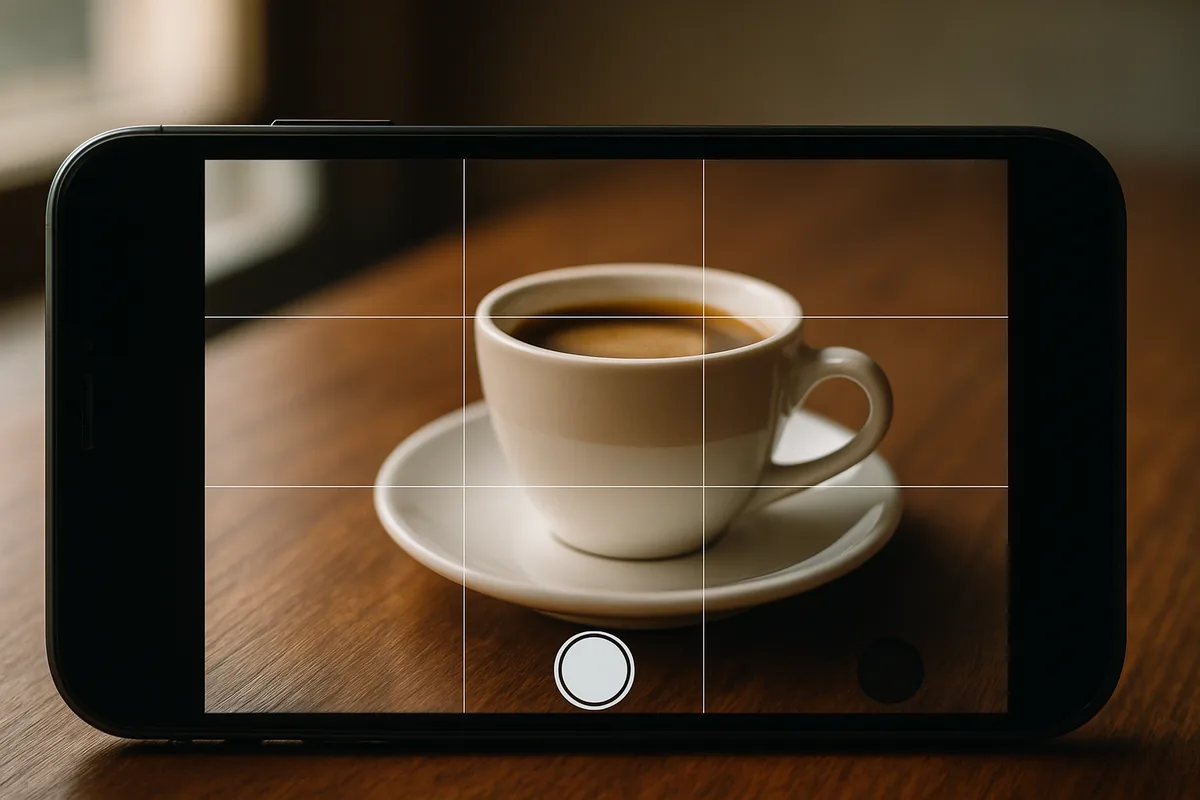
None of this means smartphone photography produces lesser images. It means the phone compensates for its physical limitations with software, and once you know how that software thinks, you can push it in the right direction instead of letting it guess.
Sensor size and why it matters
A full-frame mirrorless camera sensor measures about 36mm across. The main sensor in an iPhone 15 Pro or a Samsung Galaxy S24 Ultra measures a fraction of that — closer to 9-10mm depending on the model. A smaller sensor collects less light, which is why phones struggle more in dim rooms and produce more visible noise at night.
The upside is depth of field. Because the sensor is small, almost everything in a phone photo is naturally in focus, which is great for landscapes and street photography but makes true background blur harder to achieve without portrait mode software stepping in.
Computational photography explained simply
When you tap the shutter on a modern phone, it doesn’t take one photo — it takes several, instantly, at different exposures and focus points, then merges them using an onboard chip. This is called computational photography, and it’s the actual secret behind why smartphone photography has improved so dramatically. You can read a technical breakdown on Wikipedia’s computational photography entry if you want the deeper engineering side.
Features like Night Mode on iPhone or Samsung’s Nightography aren’t a single long exposure — they’re a stack of frames aligned and averaged in real time. Knowing this explains why holding the phone still for two extra seconds after the shutter sound matters more in smartphone photography than in traditional shooting.
Getting Started With Smartphone Photography: Camera Settings You Need to Know
Most beginners shoot in fully automatic mode and never touch a setting. That’s fine for snapshots, but a few small changes take your smartphone photography from “phone pic” to “actual photo” within minutes.
Turning on grid lines and HDR
On iPhone, go to Settings > Camera and toggle on “Grid.” On Android, open the Camera app, tap the settings gear, and look for “Grid lines” under general settings — the exact wording varies by brand, but every major Android camera app has it. This overlays a 3×3 grid on your screen for composition, which we’ll use in the next section.
For HDR (High Dynamic Range), most 2023 and newer phones handle this automatically and no longer show a manual toggle. If your phone still shows an HDR option, leave it set to “Auto” rather than forcing it on for every shot, since forced HDR can make some scenes look artificially flat.
Locking focus and exposure manually
Tap and hold on your subject in the camera app until you see a yellow (iPhone) or white (Android) box lock in place with a sun icon or slider next to it. Drag that slider up or down before shooting to brighten or darken the image manually. This one habit fixes the single most common smartphone photography mistake: letting the camera choose exposure for a backlit subject and ending up with a silhouette you didn’t want.
This lock also stops the camera from “hunting” — refocusing mid-shot when something moves through the frame, like a person walking behind your subject.
Shooting in RAW or ProRAW when available
iPhone 12 Pro and later can shoot in ProRAW (Settings > Camera > Formats), and most flagship Android phones from Samsung, Google, and OnePlus offer a RAW option inside their Pro or Expert camera mode. RAW files hold far more color and exposure information than a standard JPEG, giving you real room to edit later without the image falling apart.
The tradeoff is file size — ProRAW files can run 25-75MB each versus 2-4MB for a standard photo. Reserve RAW shooting for photos you actually plan to edit, like a landscape or a portrait, and leave your phone on standard mode for everyday snapshots.
Composition Techniques That Instantly Improve Your Phone Photos
Gear and settings only get you so far. The single biggest jump in quality for anyone practicing smartphone photography comes from learning to see a frame before pressing the shutter.
Using the rule of thirds with grid lines
With your grid lines turned on, place your subject along one of the intersecting lines instead of dead center. If you’re photographing a coffee cup on a table, position it where the left grid line crosses the bottom line rather than in the middle of the frame — it instantly reads as more intentional. You can learn more about the theory behind this on Wikipedia’s rule of thirds page.
This isn’t a rigid law — centered compositions work great for symmetry, like a doorway shot head-on. But as a default habit, off-center placement makes casual smartphone photography look far more deliberate.
Leading lines and framing with everyday objects
A city street, a row of parked cars, or a set of railroad tracks all pull the eye toward a point in the distance — use them. Stand so the line runs from a bottom corner of your frame toward your subject rather than straight down the middle.
Framing works the same way: shoot through a doorway, an archway, or even a gap in tree branches to add depth. This single trick turns a flat snapshot into something with foreground, middle ground, and background — a huge upgrade in phone camera composition that costs nothing.
Getting closer instead of zooming in
Digital zoom on a phone crops into the sensor and upscales the result, which loses detail fast — often noticeably by 3x on non-Pro phones. Instead of zooming, physically walk closer to your subject whenever possible. If you own a phone with a dedicated telephoto lens, like the 5x on an iPhone 15 Pro Max, use that optical zoom instead of pinching past it into digital territory.
Mastering Light for Better Smartphone Photography
Gear matters less than light. A $400 phone in great light will beat a $1,200 phone in bad light almost every time, which is genuinely good news for anyone getting into smartphone photography on a budget.
Shooting during golden hour and blue hour
Golden hour is the hour or so after sunrise and before sunset, when light turns warm, soft, and directional. Blue hour follows sunset (or precedes sunrise) and gives skies a deep, even blue that’s fantastic for city and skyline shots. Exact timing shifts with the seasons — check a weather app or the Golden Hour section of a sun-tracking app for your specific location and date rather than relying on a fixed clock time.
Avoiding harsh midday sun and mixed lighting
Direct overhead sun between roughly 11am and 3pm creates hard shadows and blown-out highlights that even computational photography struggles to fix. If you must shoot midday, move your subject into open shade, like under a tree or awning, rather than fighting direct light.
Mixed lighting — say, warm indoor bulbs next to a cool window — confuses your phone’s auto white balance and can leave part of the photo orange and part blue. When possible, shoot facing one dominant light source instead of standing between two competing ones.
Using window light indoors
A large window is one of the best free light sources you’ll ever use. Position your subject facing the window, about 2-3 feet away, with the phone between the subject and the light — this single setup produces the kind of soft, flattering portraits people pay for studio lighting to achieve.
Essential Accessories to Level Up Your Smartphone Photography
You don’t need a bag full of gear to take great photos, but a couple of affordable accessories genuinely expand what smartphone photography can do.
Clip-on lenses like Moment and Sandmarc
Moment and Sandmarc both make clip-on or case-mounted lenses — wide angle, macro, and anamorphic options generally run $100-$150 per lens. These attach magnetically or via a special case and physically change how light hits your sensor, unlike a software zoom.
Mini tripods and phone mounts
A small tripod, like a Joby GorillaPod (around $25-$45 depending on size), lets you shoot long exposures, group photos, or steady video without needing a second pair of hands. Combined with your phone’s built-in timer, this is one of the cheapest upgrades available to anyone serious about smartphone photography.
Gimbals for smooth video
If you shoot a lot of video, a gimbal like the DJI Osmo Mobile 6 (around $159) uses motorized stabilization to eliminate the shaky, handheld look. It’s overkill for casual photo-taking but essential if you’re producing walking tours, vlogs, or run-and-gun event footage.
| Accessory | Approximate Price | Best For |
|---|---|---|
| Moment/Sandmarc lens | $100-$150 | Wide, macro, or anamorphic shots |
| Joby GorillaPod | $25-$45 | Long exposures, group shots |
| DJI Osmo Mobile 6 | ~$159 | Smooth handheld video |
Best Apps for Editing Smartphone Photos
Editing is where a lot of everyday smartphone photography quietly becomes great photography. You don’t need Photoshop-level skill — you need one solid app and a repeatable process.
Lightroom Mobile for color and exposure
Adobe Lightroom Mobile is free to download with paid features unlocked through a Creative Cloud Photography plan (roughly $9.99/month, which also includes desktop Lightroom and Photoshop). It’s the strongest option for correcting exposure, color balance, and shadows, especially if you shot in RAW or ProRAW.
Snapseed for free advanced editing
Snapseed, made by Google, is completely free and includes selective adjustment tools, healing brush, and perspective correction that rival paid apps. For anyone not ready to pay for editing software, this is the single best free tool in smartphone photography right now.
VSCO for presets and film-style looks
VSCO offers a free tier plus a paid membership (around $29.99/year) with film-emulation presets that give digital phone photos a warmer, analog feel. It’s popular for a reason — the presets are subtle enough to look natural rather than obviously filtered.
A simple three-step workflow to copy: 1) Fix exposure and white balance first, always before color. 2) Adjust contrast and shadows/highlights to add depth. 3) Apply a light preset or subtle color grade last, and pull its intensity down if it looks too strong.
Common Smartphone Photography Mistakes Beginners Make
Everyone makes these mistakes starting out — the goal is just to make them for a shorter amount of time than everyone else.
Over-relying on digital zoom
Pinching to zoom feels natural because it’s right there on the screen, but past your phone’s optical zoom range, you’re just cropping and upscaling. Walk closer, or invest in a clip-on telephoto lens, before you reach for that pinch gesture.
Ignoring the lens smudges
Your phone lives in a pocket, a bag, and your hand — all day, every day. A smudge you can’t even see on the screen shows up as a soft, hazy patch across your entire photo. Wipe the lens with a microfiber cloth (or your shirt, in a pinch) before every shooting session; it takes three seconds and fixes more blurry photos than any app ever will.
Overusing filters and beauty modes
Beauty mode smooths skin automatically and, cranked up, makes people look like a slightly different person. Turn it off entirely, or set it to the lowest available level, and fix skin tone properly in an editing app afterward if needed. The same goes for heavy filters — a light touch reads as a style, a heavy one reads as trying too hard.
Your Next Shoot Starts Now
Smartphone photography rewards attention more than it rewards spending. Turn on your grid lines, learn to lock your exposure, chase better light instead of a better phone, and edit with a simple, repeatable process. Every tip in this guide costs nothing but a few minutes of practice.
Pick one section — light, composition, or settings — and apply it on your very next walk outside with your phone. For more phone-specific techniques, browse our full Mobile Photography category, or dig deeper into device-specific tricks in our iPhone photography tips article.
Frequently Asked Questions
Can smartphone photography really compete with a DSLR camera?
For everyday shooting, social media, and even print sizes up to 16×20 inches, modern smartphones like the iPhone 15 Pro or Galaxy S24 Ultra can produce excellent results. DSLRs still win in low light, fast action, and extreme zoom, but composition and light matter more than the camera body.
What is the best smartphone for photography in 2025?
The iPhone 15 Pro Max and Samsung Galaxy S24 Ultra are widely considered top choices thanks to their larger sensors, ProRAW support, and versatile zoom lenses. Google's Pixel 8 Pro is also excellent for computational photography and portraits.
Do I need to buy lenses for smartphone photography?
No, lenses are optional and mainly useful for specific styles like macro or ultra-wide shots. Beginners should master native camera settings and composition first before spending $100 or more on clip-on lenses.
Should I shoot in RAW format on my phone?
Shooting in RAW or ProRAW gives you more flexibility when editing exposure and color in apps like Lightroom Mobile. It's worth using once you're comfortable editing, but JPEG is fine for quick, casual shots since the files are much smaller.
How do I stop my smartphone photos from looking blurry?
Blurry photos usually come from a shaky hand, low light forcing a slow shutter speed, or a smudged lens. Clean your lens with a microfiber cloth, brace your elbows against your body, and tap to lock focus before shooting.
What's the easiest way to improve my smartphone photography today?
Turn on the grid lines in your camera settings and start applying the rule of thirds, then pay attention to natural light before you shoot. These two free habits improve most beginner photos more than any paid gear.

Mark Finley is a professional photographer, educator, and the founder of FormLovers. With years of experience behind the lens, Mark has transitioned from a passionate hobbyist to an industry professional, capturing stunning visuals and mastering the business of photography.